Note
The images for use in the tutorial are already pre-created in the repo for the project. If you wish to skip this step, you can clone the repo and retrieve them from the images folder. If you prefer to use other images, you can.
You will need some kind of image capture and manipulation software, e.g. TechSmith SnagIt. If you don’t have one, you can just use the images in the repo.
Adding Font Awesome to XPages
- Download Font Awesome “Free for Web”.
- Extract the contents.
- Open the application in Domino Designer.
- Switch to the Package Explorer view.
- Locate the
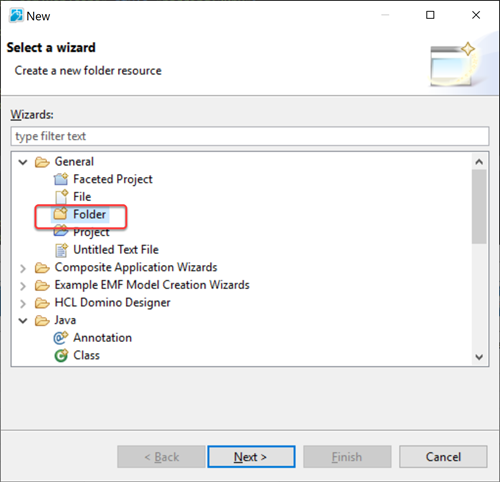
WebContentfolder. Right-click it and select Create > New > Other… Under the General category, select Folder and click Next.
- Set the folder name as “font-awesome-5.11.2”, with the number matching the Font Awesome version you downloaded.
- From Windows Explorer drag the “webfonts” folders from Font Awesome into the “font-awesome-5.11.2” folder.
- Repeat the process and create a folder named “css” under “font-awesome-5.11.2”.
- In Windows Explorer, open the “css” folder. Drag
all.cssinto the “css” folder you just created in Domino Designer.
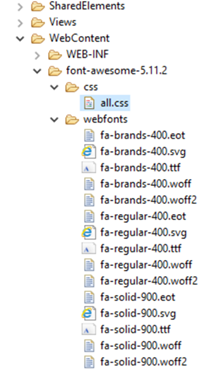
The WebContent folder should now look like this:

Status Images
Creating XPage
- Switch to the Applications view, the traditional view for navigating Domino design elements.
- Double-click on “XPages”.
- Click on the “New XPage” button. Name the new XPage “font_awesome”. Switch to the “Source” pane. The content here is XML, with attributes which can be manually typed into the Source pane, entered into properties on the “All Properties” panel or - for some properties - entered into the other “pretty panels” above the All Properties panel.
- In the All Properties panel, navigate to the
stylingcategory and thestyleproperty. Enter the valuepadding: 20px. This ensures there’s plenty of room around the content.
- Scroll up to
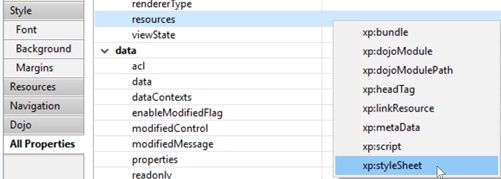
resourcesunderbasics. Click into the cell for value, to get the “Add” and “Remove” buttons. Click the Add button and select xp:styleSheet.
-
In the
hrefproperty of the styleSheet, enter/font-awesome-5.11.2/css/all.css. This will map to the Font Awesome CSS stylesheet added to the WebContent folder.Obviously if you imported a different version to the WebContent folder and named the sub-folder differently, you need to amend the
hrefproperty accordingly.
Creating Status Images
-
In the source pane, paste the following code to create a “Completed” status image:
<!-- rgb(29,181,54) --> <xp:div style="font-size:32px;color:#1db536; border: 1px solid black; padding: 4px"> <i class="fas fa-check-circle" style="padding-right: 5px"></i> Completed </xp:div> <xp:br></xp:br> <xp:br></xp:br> - Repeat, but with the following changes:
colorin thestyleproperty set to#2d72ad.classproperty of the<i>tag set tofas fa-times-circle.- Text set to
Incomplete.
- Repeat, but with the following changes:
colorin thestyleproperty set to#fcba03.classproperty of the<i>tag set tofas fa-exclamation-circle.- Text set to
Urgent!.
- Repeat, but with the following changes:
colorin thestyleproperty set tored.classproperty of the<i>tag set tofas fa-exclamation-triangle.- Text set to
Overdue.
- Save and build the XPage. (Saving saves the XML file, a builder needs to be run to convert the XML to a Java class, which the server runs.)
- Preview the XPage.
Depending how the server is configured, Domino Designer may or may not get the right host name when previewing the XPage. If the page does not load, remove everything after the hostname and verify you get the Domino server page. If you don’t, double-check the hostname and verify that the “http” task is running. You can verify the http task is running by issuing the command sh ta (short for “show tasks”) on the Domino server. HTTP should be one of the listed tasks. If you get the server name but cannot get the XPage by previewing it, double-check it has built. You can build it again in Domino Designer by selecting Project > Build Project (builds the current application) or Project > Build All (builds any open application).
Taking and Resizing Status Images
The images will be created using Font Awesome, presented via XPages. The images need to be of an appropriate size for HCL Nomad. With modern screen resolutions, it can be easier to capture the image at a larger size and resize.
- Capture an image of the “Completed” status image, from one pixel inside the black border. Note the pixel sizes, so the other images can be captured at the same size.
- Resize the image to 40px high, keeping the aspect ratio.
- Save the image with the filename “complete-doc.png” for importing into the To Do application later.
- Repeat for the other three statuses - Incomplete, Urgent! and Overdue. Filename should be “incomplete-doc.png”, “urgent-doc.png” and “overdue-doc.png”. Ensure you capture the image at the same pixel sizes, so that as you change the status of a To Do document, the switch feels seamless.
Creating Action Button Images
Notes can have buttons on the Action Bar and buttons within a Form as hotspots. But this tutorial will use images for the buttons, with hotspots around the button. This is to give a richer styling.
- Return to Domino Designer and the XPage.
-
In the source pane, paste the following code to create a “Save” button image.
<xp:button style="font-size: 16px; background-image: none; background-color: #1db536; color: white; border: 1px solid black; text-shadow: none" value="Save"> </xp:button> - Repeat but with the following changes:
background-colorin thestyleproperty set to#1db536.valueproperty set toEdit.
- Repeat but with the following changes:
background-colorin thestyleproperty set tored.valueproperty set toCancel.
- Repeat but with the following changes:
background-colorin thestyleproperty set tored.valueproperty set toDelete.
-
In the source pane, paste the following code to create a “Mark Complete” button image.
<xp:button style="font-size: 16px; background-image: none; background-color: #1db536; color: white; border: 1px solid black; text-shadow: none" value="Mark Complete"> <i class="fas fa-check-circle" style="padding-right: 2px"></i> </xp:button> - Repeat but with the following changes:
background-colorin thestyleproperty set to#2d72ad.valueproperty set toMark Incomplete.classproperty of the<i>tag set tofas fa-times-circle.
- Save and build the XPage again.
- Preview the XPage or refresh the browser tab, if you still have it open.
- Capture an image of the “Save” button image, from one pixel outside the button and drop shadow.
- Resize the image to 30px high, keeping the aspect ratio.
- Save the image with the filename “button-save.png” for importing into the To Do application later.
- Repeat for the other buttons - Edit, Cancel, Delete, Mark Complete and Mark Incomplete. Filenames should be “button-edit.png”, “button-cancel.png”, “button-delete.png”, “button-mark-complete.png” and “button-mark-incomplete.png”. The buttons will not be overlaid on one another but sitting side-by-side, so they do not need to be captured at the same widths.
Creating Images for Changing Views
Creating Images
- Return to Domino Designer and the XPage.
-
In the source pane, paste the following code to create a “Completed” view image.
<div style="background-color: #ffffff"> <i class="fas fa-check-circle" style="color:#1db536; font-size: 32px; padding: 2px; border: 1px solid black"></i> </div> - Duplicate the
<i>tag still within the same div with the following change:classproperty set tofas fa-times-circle.colorin thestyleproperty set to#2d72ad.
- Duplicate the
<i>tag still within the same div with the following change:classproperty set tofas fa-exclamation-circle.colorin thestyleproperty set to#fcba03.
- Duplicate the
<i>tag still within the same div with the following change:classproperty set tofas fa-exclamation-triangle.colorin thestyleproperty set tored.
- Duplicate the
<i>tag still within the same div with the following change:classproperty set tofas fa-clipboard-list.colorin thestyleproperty set to#5c5c5c.
- Duplicate the
<i>tag still within the same div with the following change:classproperty set tofas fa-calendar-alt.colorin thestyleproperty set to#000070.
- Save and build the XPage again.
- Preview the XPage or refresh the browser tab, if you still have it open.
- Capture an image of the “tick” view image, from two pixels outside the image.
- Resize the image to 91px high, keeping the aspect ratio.
- Save the image with the filename “complete-dashboard.png” for importing into the To Do application later.
- Repeat for the other view images - incomplete, urgent, overdue, todo and calendar. Filenames should be “incomplete-dashboard.png”, “urgent-dashboard.png”, “overdue-dashboard.png”, “todos-dashboard.png” and “calendar-dashboard.png”.
Creating Selected Versions of the Images
The images include the background colour. To identify whether the view image is selected or not, create a different version witth a different background.
- Return to Domino Designer and the XPage.
- Change the
background-colorproperty of thedivtag to#c9c9c9. - Repeat the process for creating the previous versions of the images. Filenames should be “complete-dashboard-selected.png”, “incomplete-dashboard-selected.png”, “urgent-dashboard-selected.png”, “overdue-dashboard-selected.png”, “todos-dashboard-selected.png” and “calendar-dashboard-selected.png”.
Create New To Do Image
- Copy the “todos-dashboard.png”.
- Using an appropriate image package, add a yellow star badge over the image.
- Save the image as “todo-new.png”.
Congratulations!
You should now have:
- four status images (complete-doc.png, incomplete-doc.png, overdue-doc.png, urgent-doc.png)
- six button images (button-cancel.png, button-delete.png, button-edit.png, button-mark-complete.png, button-mark-incomplete.png, button-save.png).
- seven dashboard images with a white background (calendar-dashboard.png, complete-dashboard.png, incomplete-dashboard.png, overdue-dashboard.png, todo-new.png, todos-dashboard.png, urgent-dashboard.png)
- six dashboard images with a grey background (calendar-dashboard-selected.png, complete-dashboard-selected.png, incomplete-dashboard-selected.png, overdue-dashboard-selected.png, todos-dashboard-selected.png, urgent-dashboard-selected.png)