Forms and Pages
In some parts of the application you will need to display content without prompting for data entry and creating documents. Pages can be used for this purpose as can Forms. There are two differences:
- Form can have fields on them.
- Forms will prompt for saving when you close them.
Fields become useful when it comes to touch-screen devices. On the To Do form hotspots were added around the button images. Action Hotspots can be added around text, images or fields. However, on occasion the text you want to display may need to be configurable. On the To Do form Computed Text was used for a configurable value, for the author of the To Do. However, an Action Hotspot cannot be added around Computed Text or anything that includes Computed Text. This means the content including the Computed Text cannot be clickable. In those scenarios, Forms with fields become very useful.
However, by default the user will be prompted whether or not to save the document when closing the application. Preventing a prompt for saving is something that can be handled, as you will see.
Creating the Dashboard Form
- In the Applications view of Domino Designer, double-click on the Forms part in the To Do application.
- Click the “New Form” button and call the new Form “dashboard”.
- On the first line, add a field using the “Create Field” button or the menu option Create > Field….
-
Name the field “SaveOptions”, leaving it as Text and Editable. Set the Default Value as
"0".
If a Form has a field on it with SaveOptions set to “0” then it will not save. This also means it won’t prompt for saving when closing the application.
-
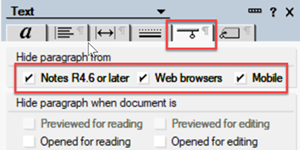
On the Hide When tab, for “Hide paragraph from” tick to hide it from “Notes R4.6 or later”, “Web” and “Mobile”.
- Add a new line. In the Text Properties clear the ticks from “Hide paragraph when”, so this line will show.
- From the menu, select Create > Table…. Set “Number of rows” to 1, “Number of columns” to 5 and Table Width to “Fit to Window”.
-
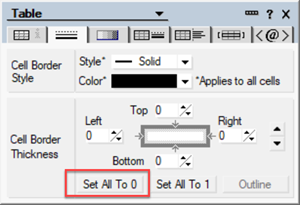
Select all the cell and, on the second tab of the Table Properties, “Cell Borders”, click “Set all to 0”.
- Use the drop-down at the top of the dialog to switch from Table Properties to Text Properties.
- Change the font to “Verdana”, the font size to “Bold” and the font size to 14. On the second tab, Paragraph Alignment, change alignment to centered.
Creating the Dashboard
Incomplete
- From the menu, select Create > Image Resource… and choose “incomplete-dashboard.png”.
- Add a new line. Open the Text Properties and click on the Color drop-down and, in the popup, click on the colour picker. Change
- Change the font colour to RGB 45, 114, 173. Add the text “Incomplete”.
- From the menu, select Create > Table…. Set the “Number of rows” to 1, “Number of columns” to 1 and Table Width to “Fixed Width” and 2cm.
-
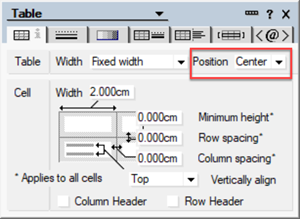
The table will default to left-aligned with a border. Open up the Table Properties and, on the first tab, change the “Position” to Center.
- On the third tab, change the cell colour from “(none)” to RGB 45, 114, 173.
- Use the drop-down to switch from Table Properties to Text Properties.
- Change the font colour to white. On the second tab, Paragraph Alignment, change alignment to centered.
-
Use the menu option Create > Field…. Set the field name to “IncompleteTotal”, change the Type from “Editable” to “Computed for display”. Set the value to the formula
@Elements(@DbColumn("":"NoCache";"";"incompleteView";1)).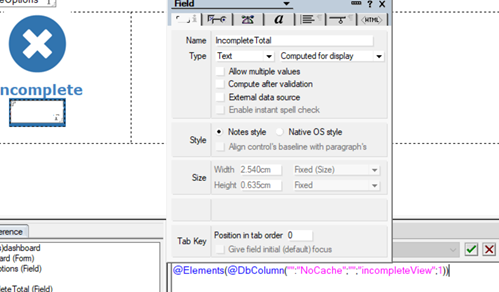
The formula does a count of the number of entries in the “incompleteView” view, so giving the number of incomplete To Do documents.
-
Select the “incomplete-dashboard.png” image resource and the word “Incomplete”. From the menu, select Create > Hotspot > Action Hotspot. Take the tick out of “Show border around hotspot”, as before. Enter the following formula:
@Environment("ToDo_View";"incompleteView"); @Command([RefreshWindow])@Environmentgets or sets an environment variable, a variable stored in the notes.ini configuration file. This can be used to set values in one part of the application and use them elsewhere. -
Select the “IncompleteTotal” field and create a hotspot with the same formula. You cannot just click on the field, you will need to drag the cursor over the whole field until the background behind the field changes colour.
A single hotspot cannot include a table, so you need two hotspots. Also, if a hotspot is applied across multiple lines, formatting gets applied to all of them.
- Click at the end of the line with the word “Incomplete”, after the hotspot. Open the Text Properties and change the spacing on the Paragraph Alignment tab for “Below” to “1 1/2”.
- Click onto the “IncompleteTotal” field. Open the Text Properties and change the spacing on the Paragraph Alignment tab for “Above” and “Below” to “1 1/2”.
Completed, Urgent and Overdue
- Repeat for the second cell with the following changes:
- Use
complete-dashboard.pngimage resource. - Set text colour to 29, 181, 54.
- Enter text “Completed”.
- Set cell colour to 29, 181, 54.
- Name field “CompleteTotal”.
- Set the field’s value formula to
@Elements(@DbColumn("":"NoCache";"";"completeView";1)). - Change the first line of the hotspot formula to
@Environment("ToDo_View";"completeView");.
- Use
- Repeat for the third cell with the following changes:
- Use
urgent-dashboard.pngimage resource. - Set text colour to 252, 186, 3.
- Enter text “Urgent”.
- Set cell colour to 252, 186, 3.
- Name field “UrgentTotal”.
- Set the field’s value formula to
@Elements(@DbColumn("":"NoCache";"";"urgentView";1)). - Change the first line of the hotspot formula to
@Environment("ToDo_View";"urgentView");.
- Use
- Repeat for the third cell with the following changes:
- Use
overdue-dashboard.pngimage resource. - Set text colour to 255, 0, 0.
- Enter text “Overdue”.
- Set cell colour to 255, 0, 0.
- Name field “OverdueTotal”.
- Set the field’s value formula to
@Elements(@DbColumn("":"NoCache";"";"overdueView";1)). - Change the first line of the hotspot formula to
@Environment("ToDo_View";"overdueView");.
- Use
The form should now look like this, with one cell of the table still empty.

Because table cell colours have been used, there is not an option to give a rounded border. But if an image is used, it’s not possible to compute the total of To Dos for that status. Try to develop it in a way that gives a rounded border, so a more sophisticated look.
Create To Do and Change Views
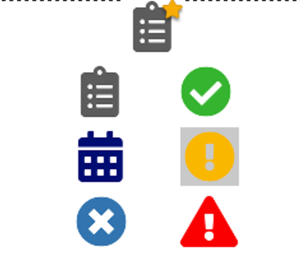
The final cell is for creating a new To Do and switching views. The dashboard areas allow switching views. But that might not be obvious for some users. Also the calendar view and view for all To Dos don’t have a dashboard statistic, because those views have all the To Dos in the database. And a button needs to be provided for creating new To Dos. So it makes sense to add buttons for all of those in the final cell.
Create the images
- In the final cell, from the menu, select Create > Image Resource…. Select the “todo-new.png” image.
-
Use the menu Picture > Picture Properties. In the Scaling %, change the width and height to 50.
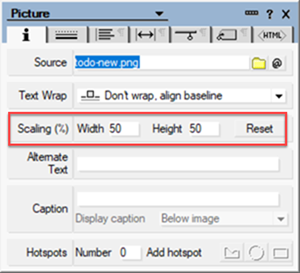
- On the next line, repeat to insert “todos-dashboard.png”.
-
Change the picture scaling to 50% and click the “@” button to compute the image to display. Enter the formula
@If(@Environment("ToDo_View")="todosView";"todos-dashboard-selected.png";"todos-dashboard.png")The formula will look for the ToDo_View environment variable, which is also the one set via the hotspots on the dashboard area. If the environment variable is for “todosView”, the selected version of the image will be used, the one with the shaded background. If not, the version with a white background will be displayed.
- Add five spaces. Repeat to insert “complete-dashboard.png”.
- Change the picture scaling to 50% and click the “@” button to compute the image to display. Enter the formula
@If(@Environment("ToDo_View")="completeView";"complete-dashboard-selected.png";"complete-dashboard.png") - On the next line, repeat to insert “calendar-dashboard.png”.
- Change the picture scaling to 50% and click the “@” button to compute the image to display. Enter the formula
@If(@Environment("ToDo_View")="calendarView";"calendar-dashboard-selected.png";"calendar-dashboard.png") - Add five spaces. Repeat to insert “urgent-dashboard.png”.
- Change the picture scaling to 50% and click the “@” button to compute the image to display. Enter the formula
@If(@Environment("ToDo_View")="urgentView";"urgent-dashboard-selected.png";"urgent-dashboard.png") - On the next line, repeat to insert “incomplete-dashboard.png”.
- Change the picture scaling to 50% and click the “@” button to compute the image to display. Enter the formula
@If(@Environment("ToDo_View")="incompleteView";"incomplete-dashboard-selected.png";"incomplete-dashboard.png") - Add five spaces. Repeat to insert “urgent-dashboard.png”.
- Change the picture scaling to 50% and click the “@” button to compute the image to display. Enter the formula
@If(@Environment("ToDo_View")="overdueView";"overdue-dashboard-selected.png";"overdue-dashboard.png")
Because the calendar image is wider, the images may not fully line up. Use different spacing on the final line to align the buttons.
Add Hotspots
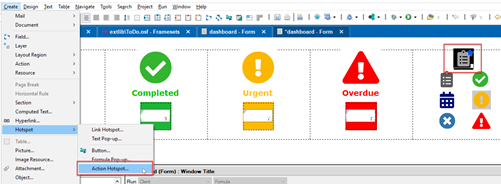
- Select the “todo-new.png” image and from the menu select Create > Hotspot> Action Hotspot….
-
Take the tick out of “Show border around hotspot” and enter the following formula for the hotspot:
 @SetTargetFrame("NotesPreview");
 @Command([Compose];"todo")
The formula will compose the a document based on the “todo” Form, targeting a Frame called “NotesPreview” as its context. The next part of the tutorial will cover frames.
-
Repeat for the “todos-dashboard.png”, the first image on the second line. Enter the following formula:
@Environment("ToDo_View";"todosView"); @Command([RefreshWindow]) - Repeat for the remaining images, changing the formulas as follows:
- For “complete-dashboard.png”, change the first line of the formula to
@Environment("ToDo_View";"completeView");. - For “calendar-dashboard.png”, change the first line of the formula to
@Environment("ToDo_View";"calendarView");. - For “urgent-dashboard.png”, change the first line of the formula to
@Environment("ToDo_View";"urgentView");. - For “incomplete-dashboard.png”, change the first line of the formula to
@Environment("ToDo_View";"incompleteView");. - For “overdue-dashboard.png”, change the first line of the formula to
@Environment("ToDo_View";"overdueView");.
- For “complete-dashboard.png”, change the first line of the formula to
The final cell should look like this:
Congratulations!
You have now set up the dashboard Form. All that is left is to put everything together and test.